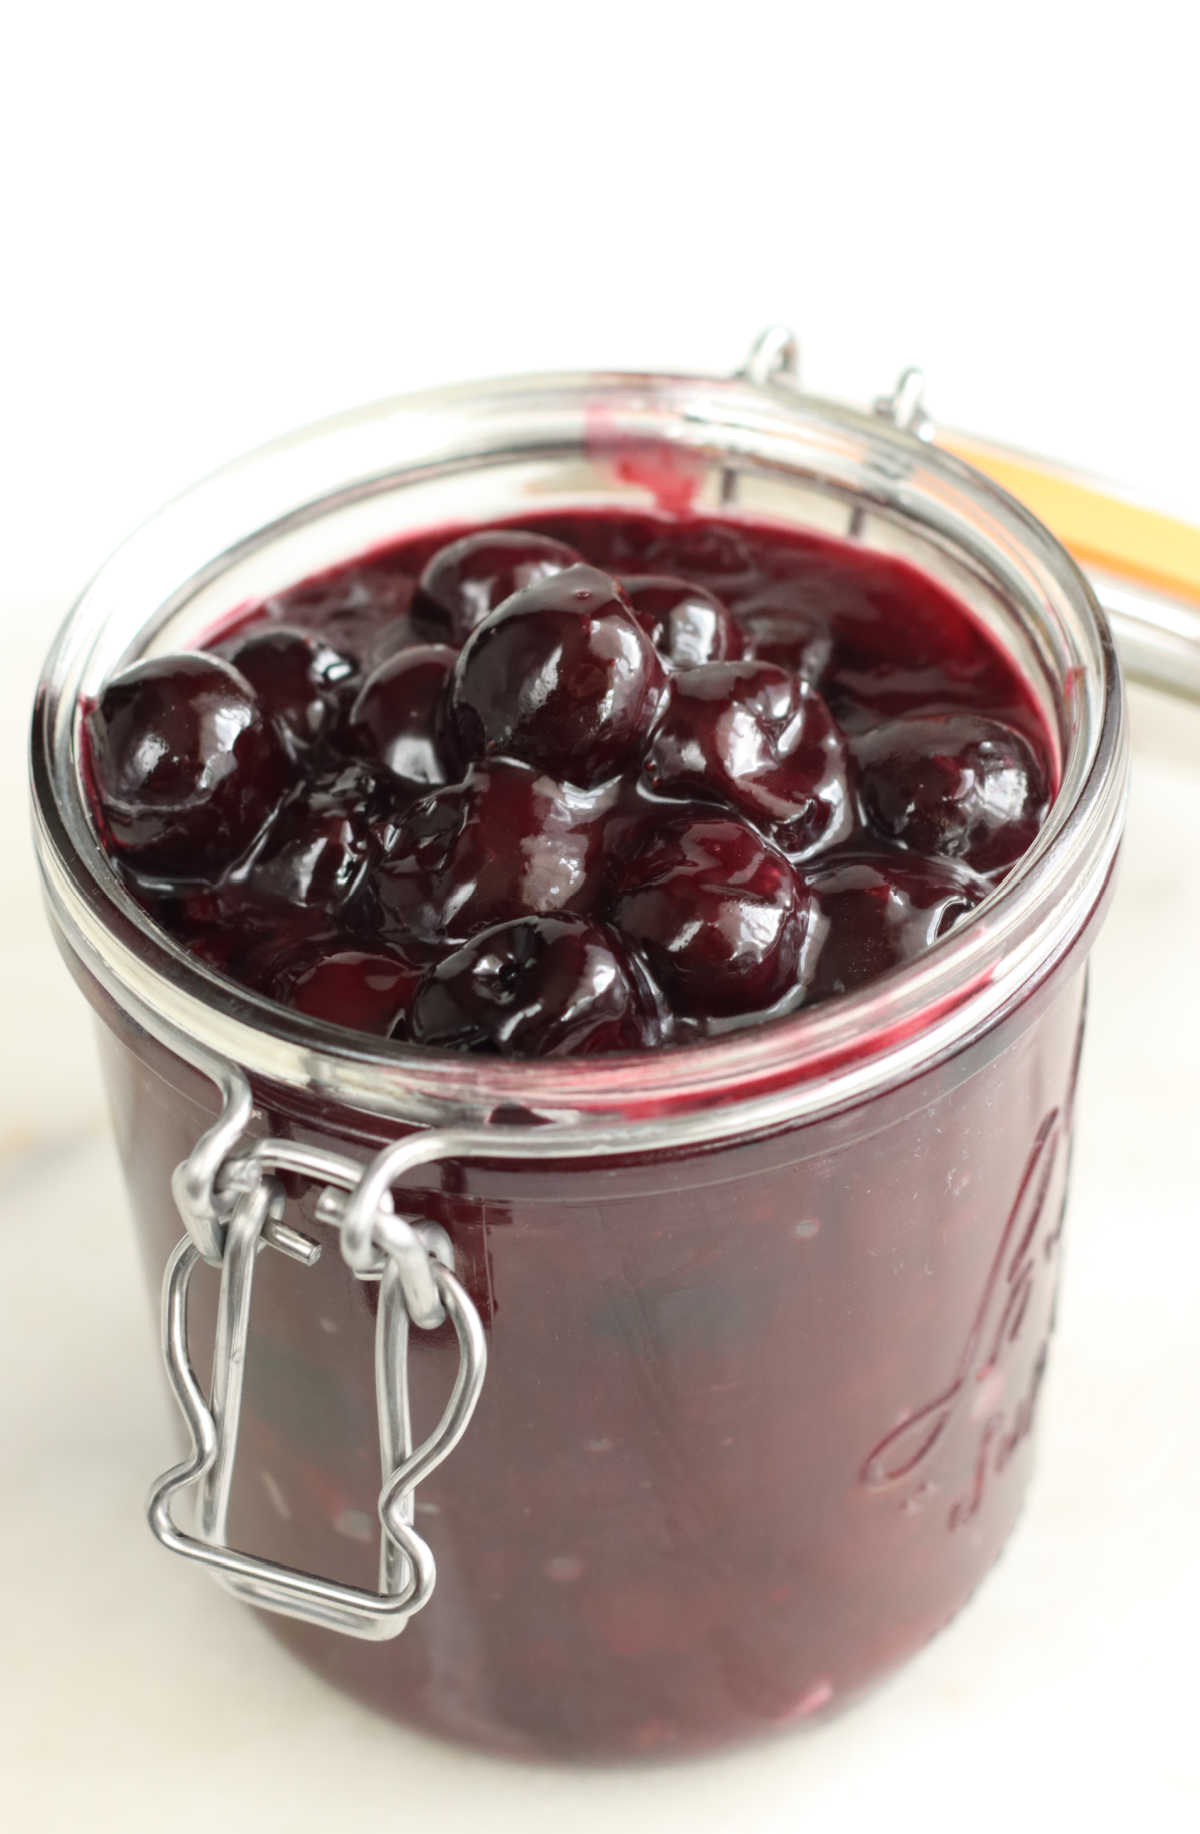
Cherry pie filling is made fresh or frozen cherries. Homemade pie filling is so much better than canned pie filling.
Even the most novice baker can achieve great results with this cherry pie recipe. Made with fresh or frozen cherries and baked inside a homemade flaky pie crust.
Do you love homemade pie? Cherry pie is my ultimate favorite.
Homemade pie is nothing to fear and so simple to make. Whether you use Homemade Pie Crust or store-bought, making a cherry pie from scratch is easy.
Making homemade fruit pies is therapeutic to me. I love mixing pie dough by hand. And the way a homemade pie smells as it bakes- it just fills the house with such a delicious aroma!

Why this recipe works
- Uses simple ingredients that are readily available at most grocery stores.
- Let’s you control the ingredients. No added coloring or preservatives.
- Make ahead – Cherry pie filling can be made ahead of time, refrigerated for a few days or frozen for a few months.
What you’ll need
- Cherries – Use fresh or frozen cherries for this pie filling recipe. If using fresh, use a cherry pitter to easily remove the pits.
- Sugar– Adds a little sweetness to the cherries. Adjust to your liking or depending on how sweet or tart your cherries are.
- Butter – Adds a nice touch of flavor to this recipe.
- Lemon juice – Acts as a preservative and adds a tartness to the flavors.
- Cornstarch – Will help to thicken the pie filling.
How to make cherry pie filling
Making cherry pie filling from scratch could not be easier with this amazing little kitchen gadget- cherry pitter on Amazon.
Step 1: Work over a Pyrex liquid measuring cup, pitting cherries right over the cup. Then tossing the pitted cherries into a large pan. Place your hand over the pits and gently pour any cherry juices into the pitted cherries.
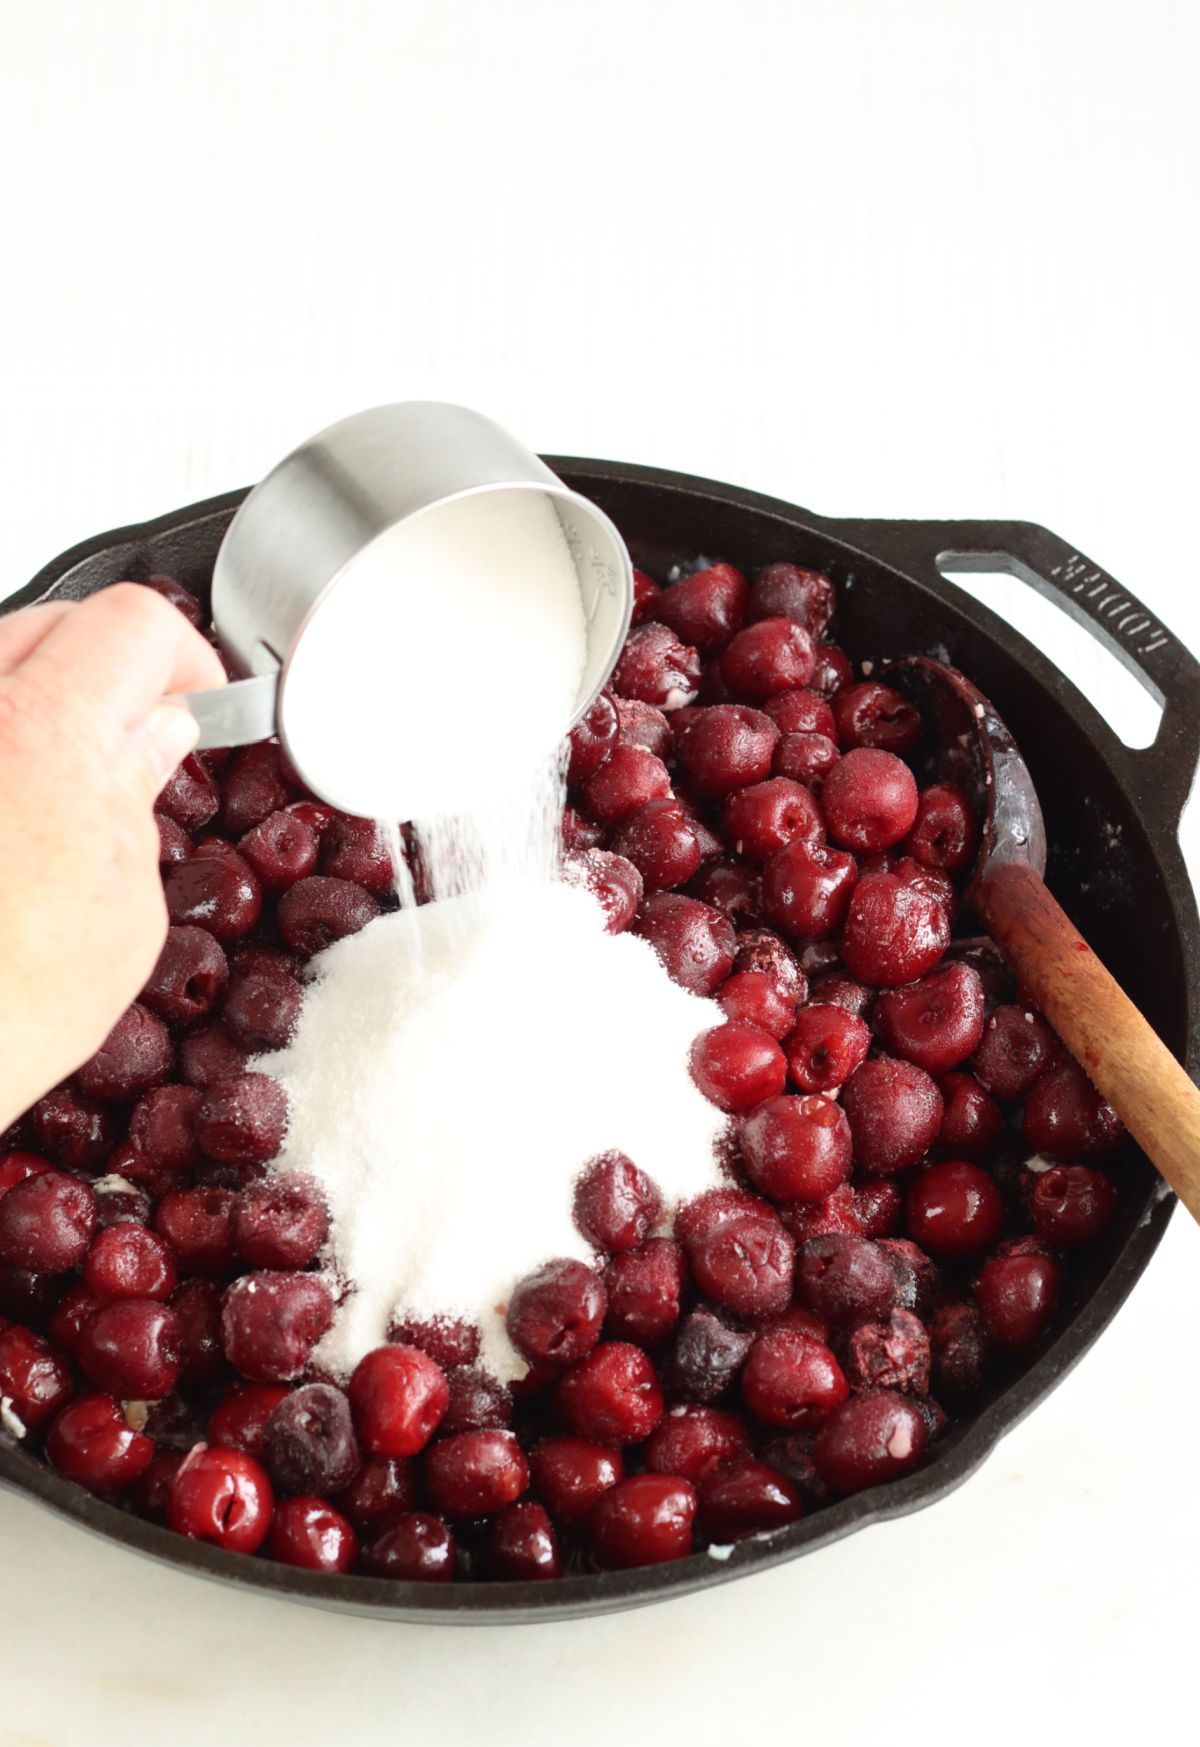
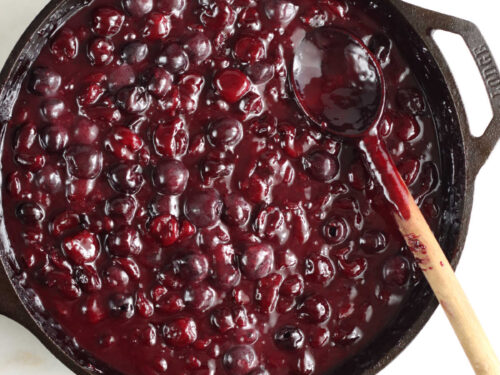
Step 2: Cook the cherries over medium heat. Add the sugar and lemon juice. Cook until soft, stirring with a wooden spoon occasionally. Dissolve the cornstarch into cold water, stir with a tablespoon.
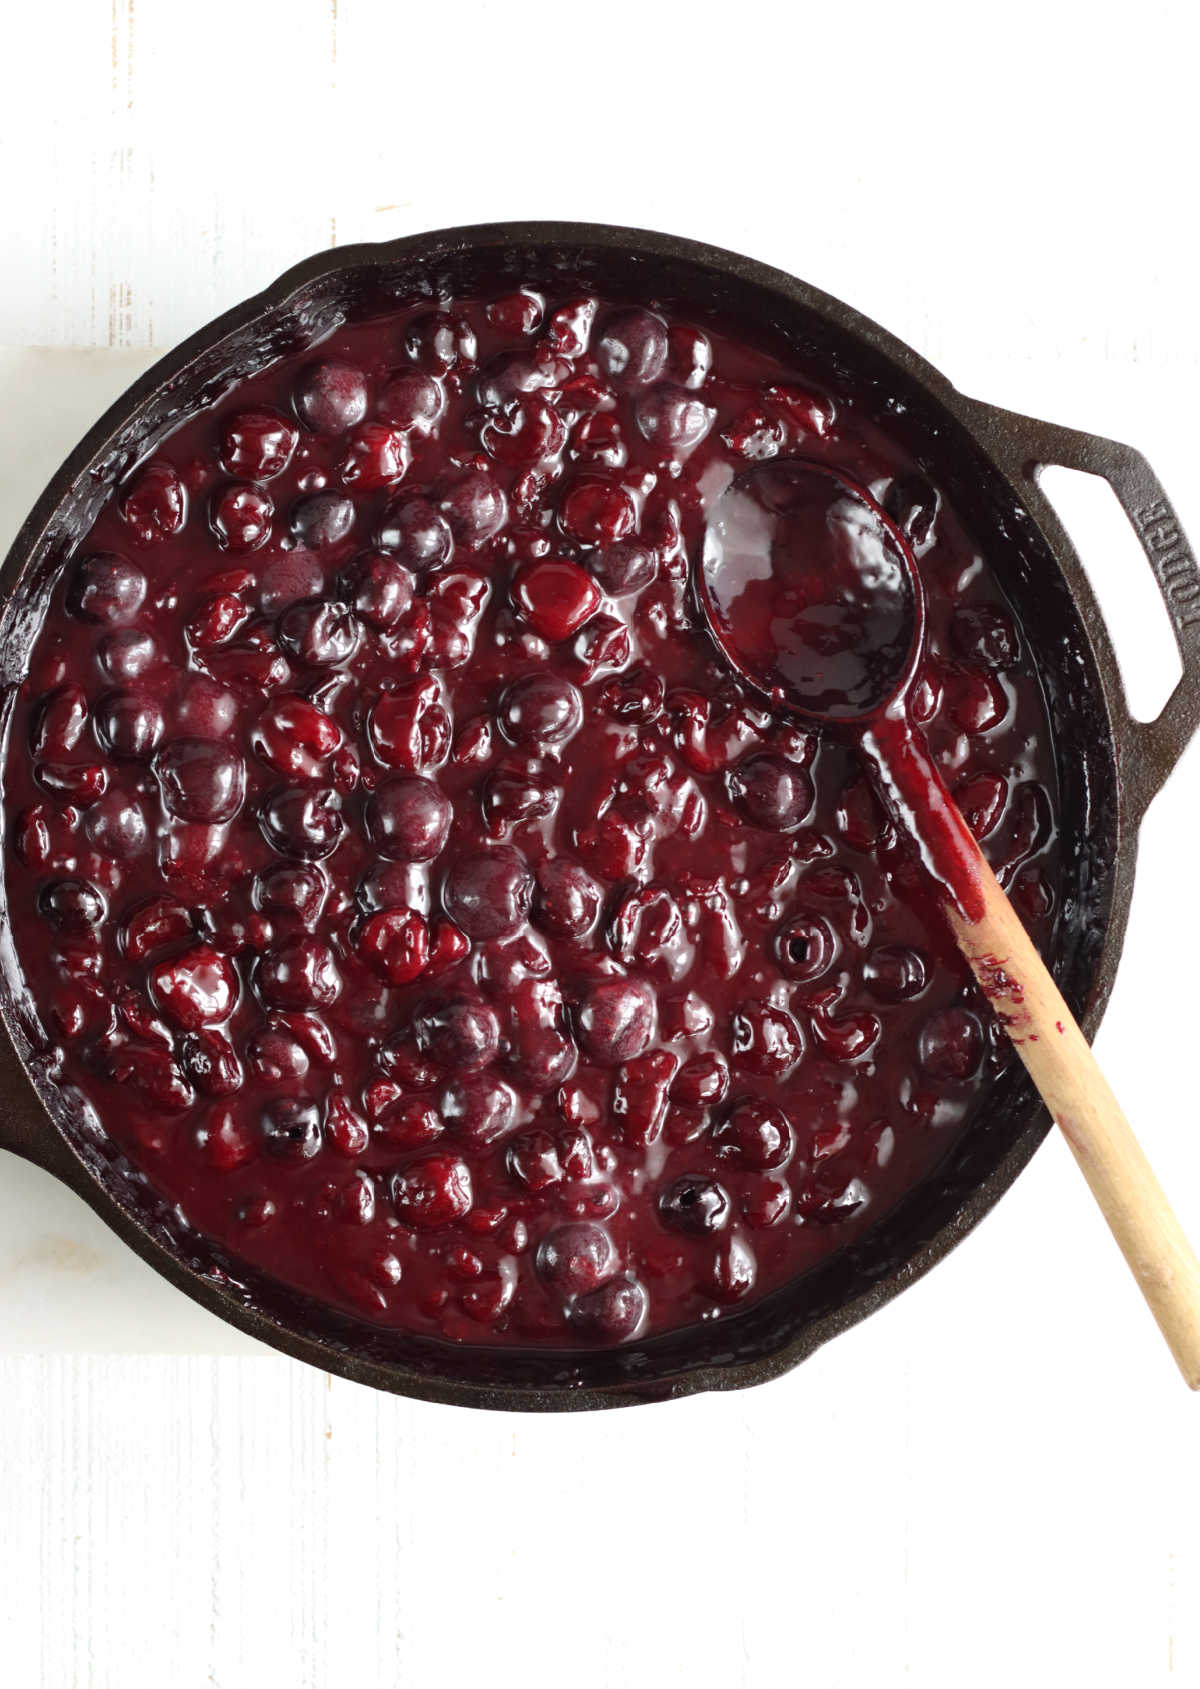
Step 3: Stir the cornstarch mixture into the cherry mixture. Cook over medium to high heat to thicken. Stir constantly with a wooden spoon.
Step 4: Let the pie filling cool completely before pouring into the prepared unbaked pie crust.
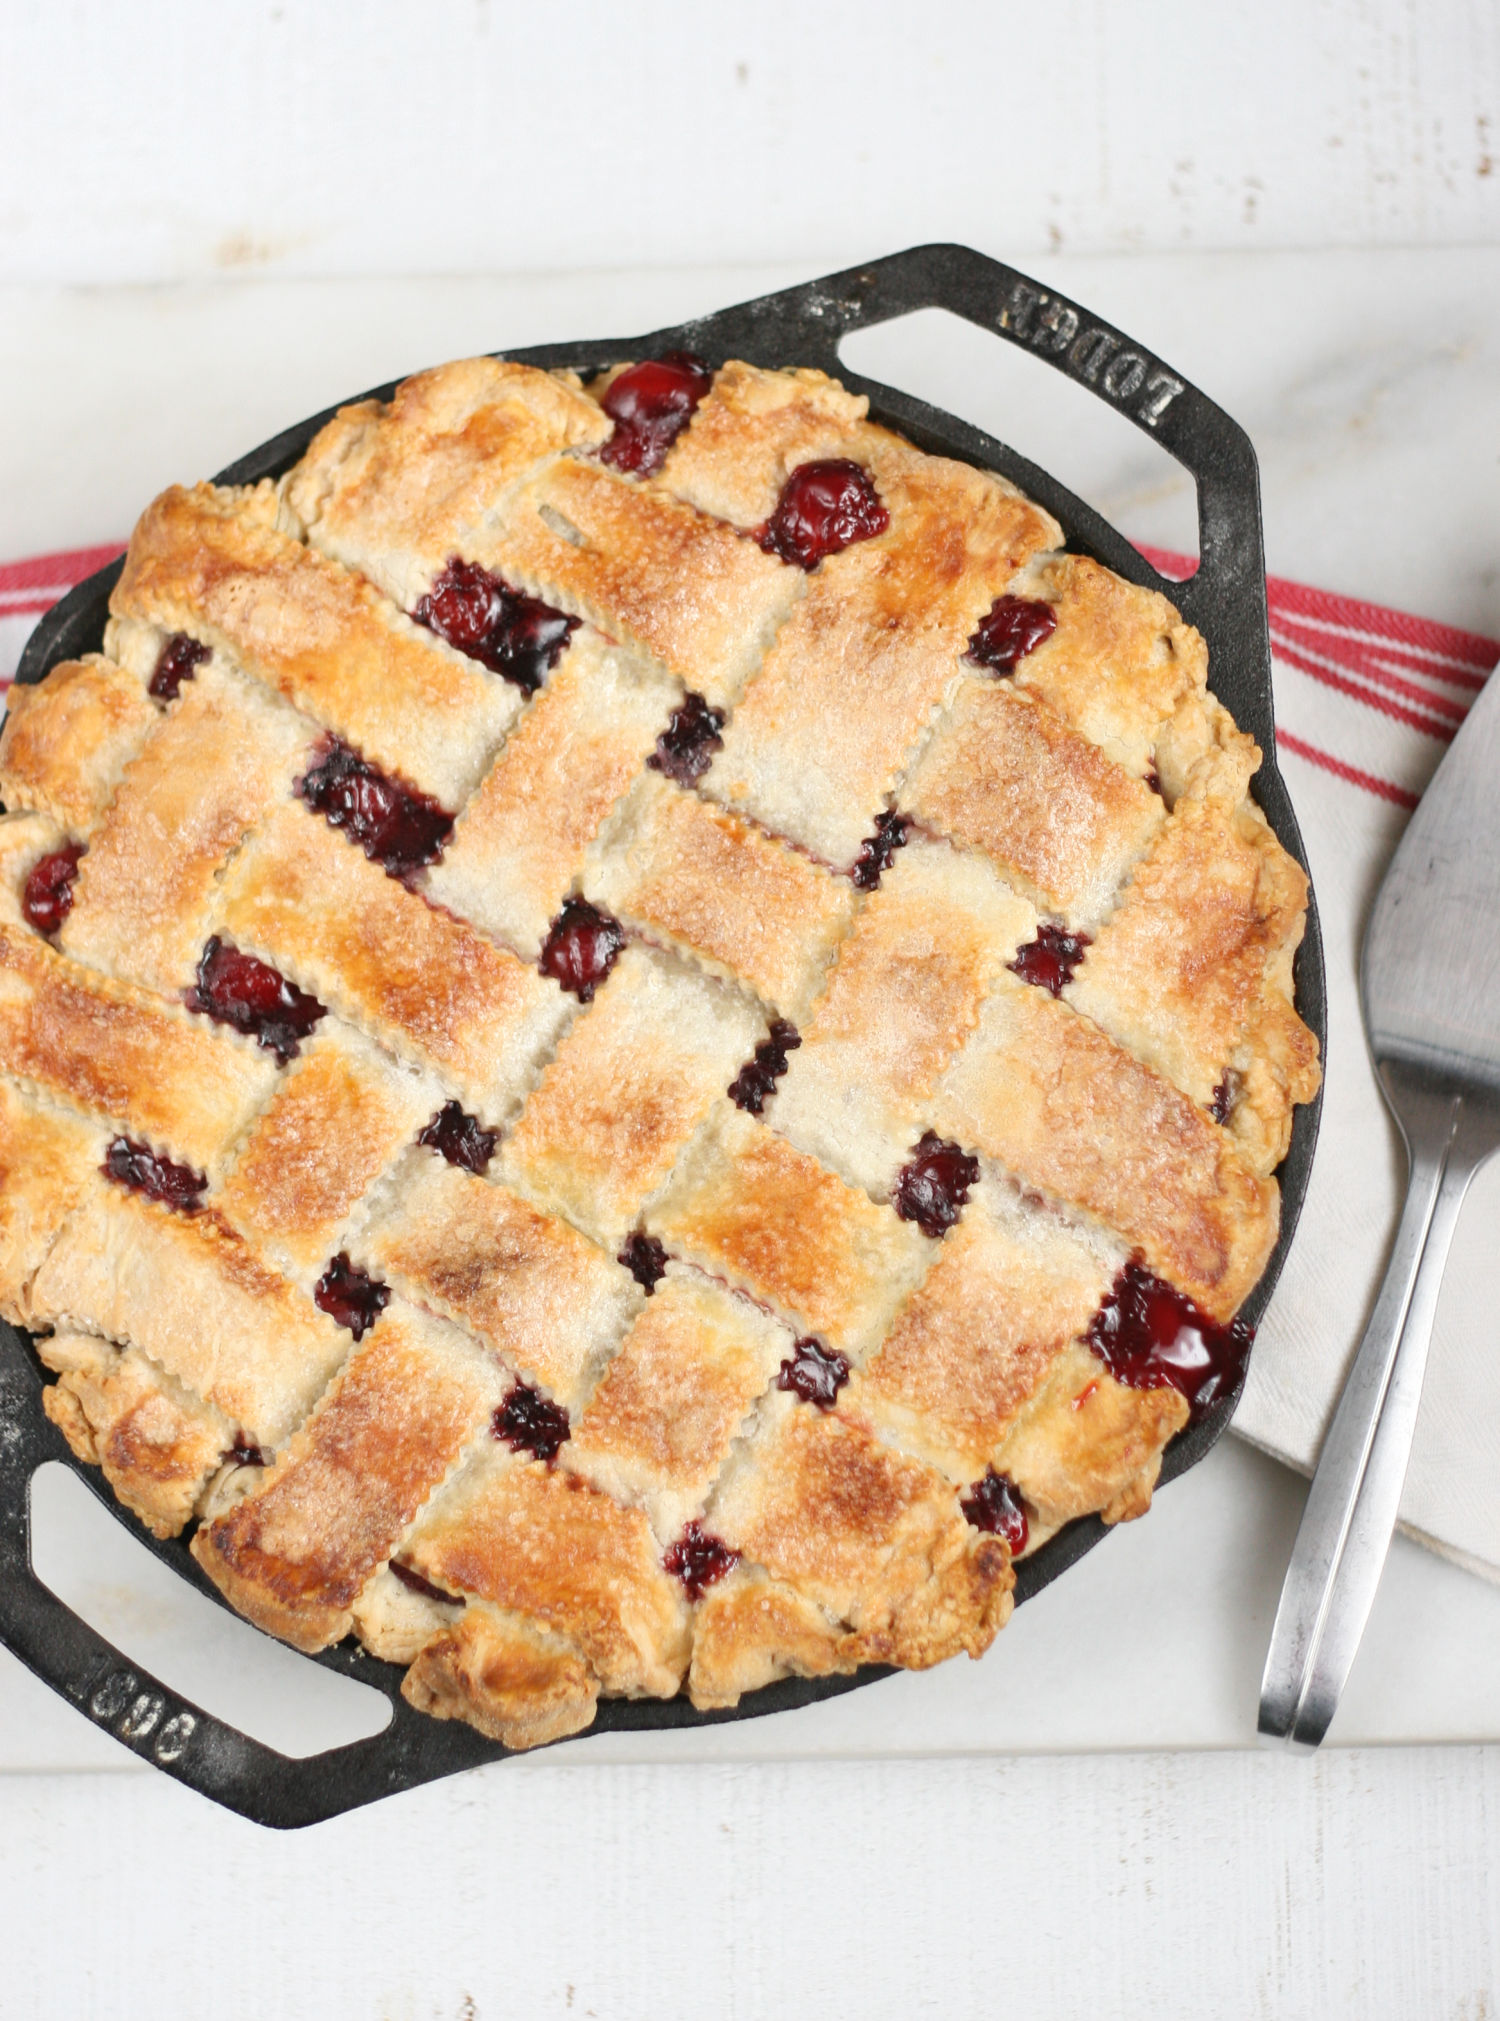
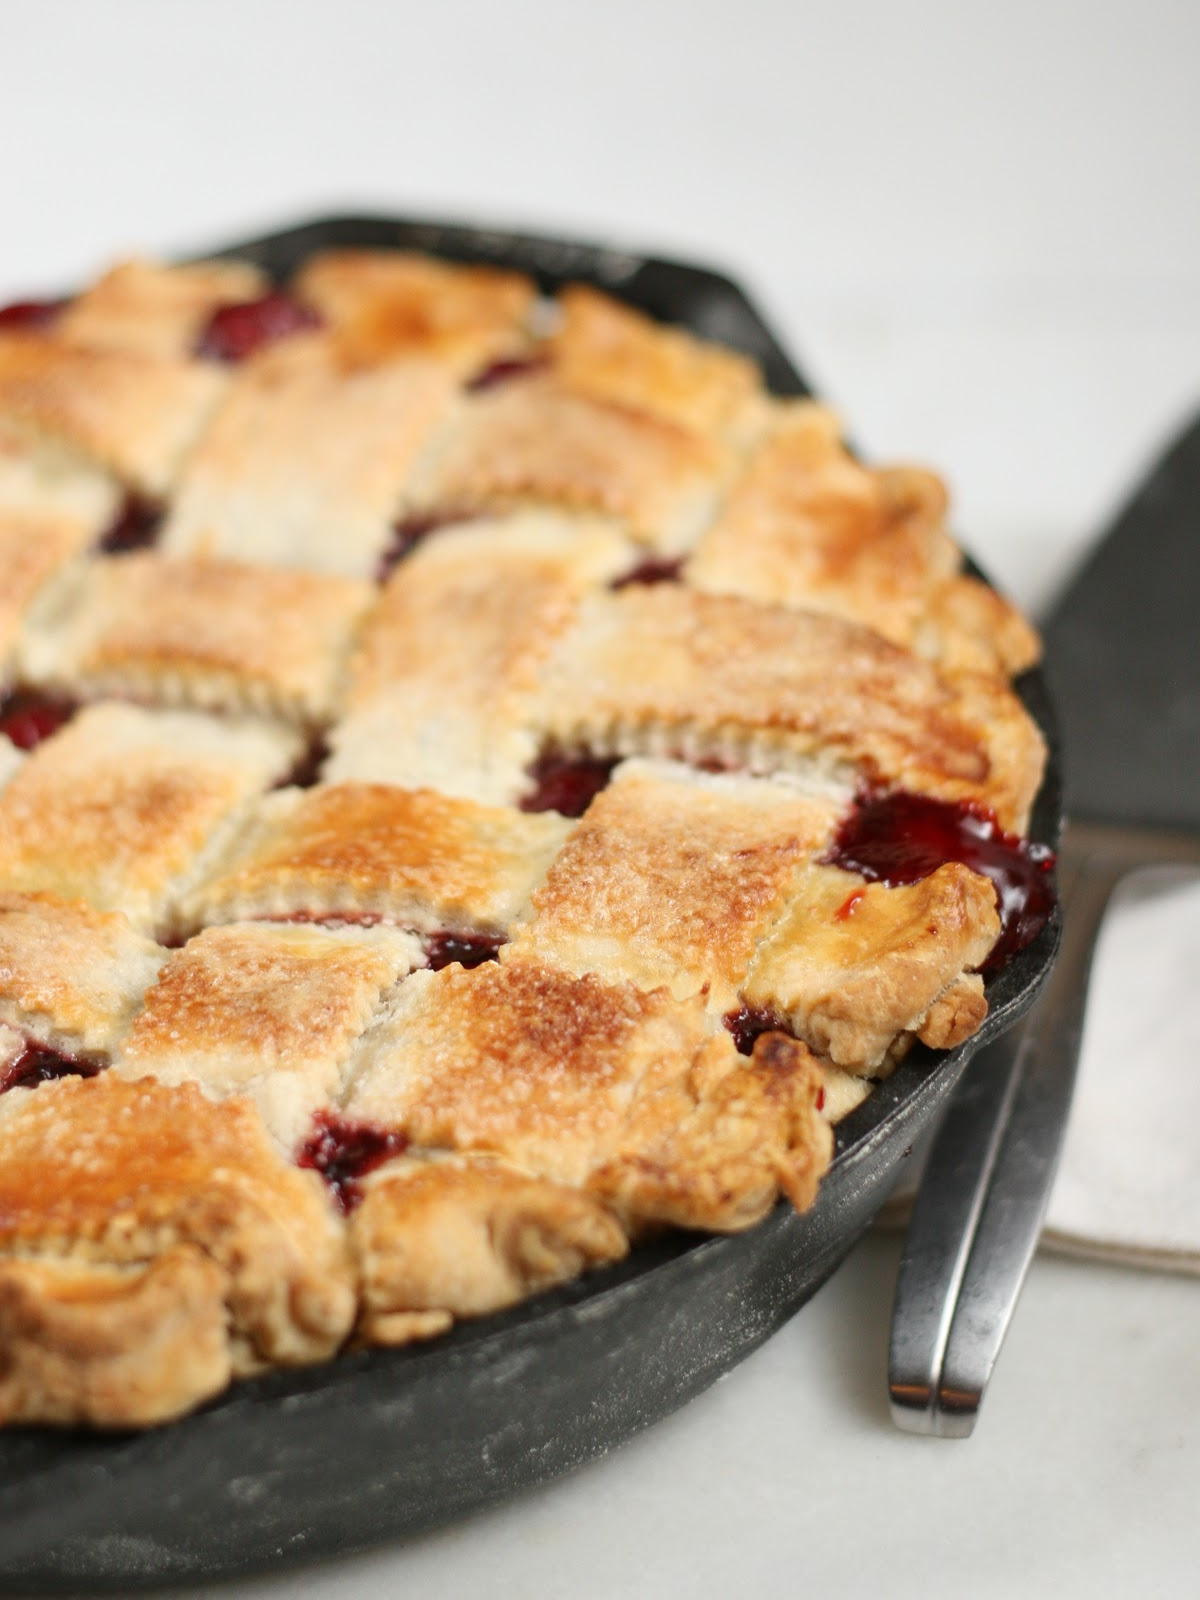
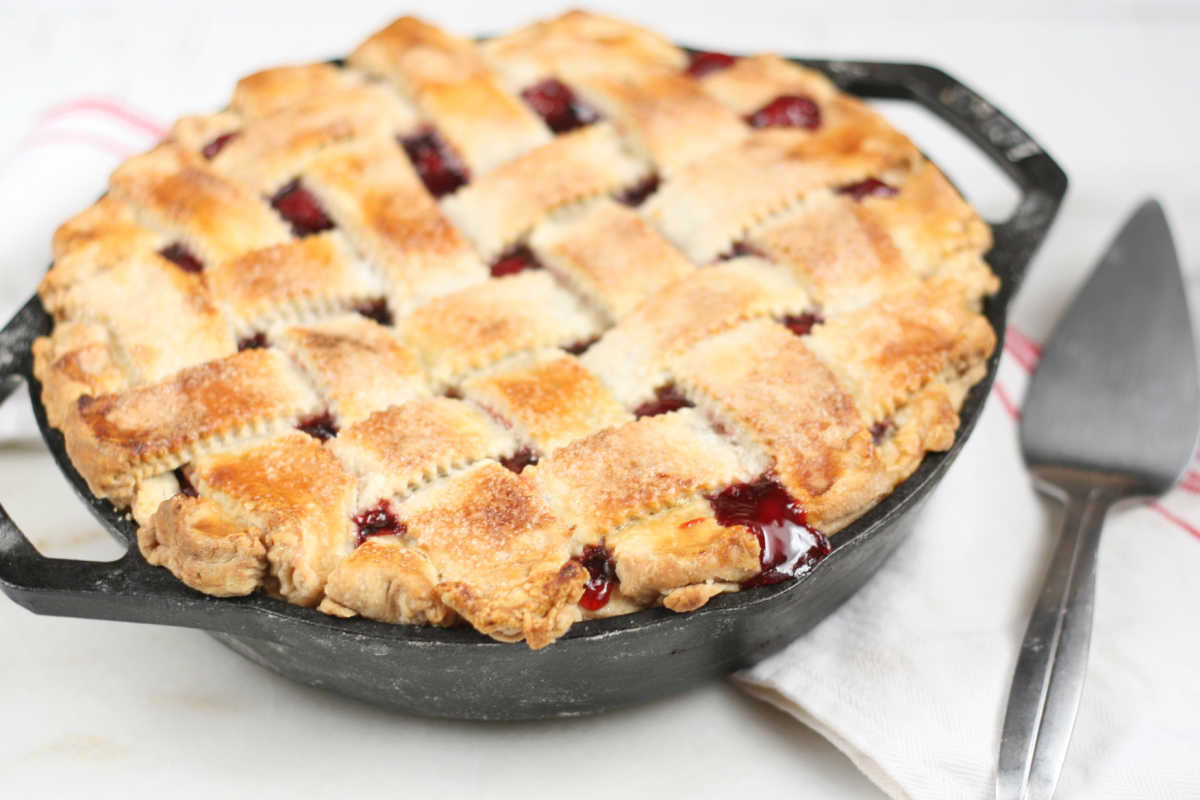
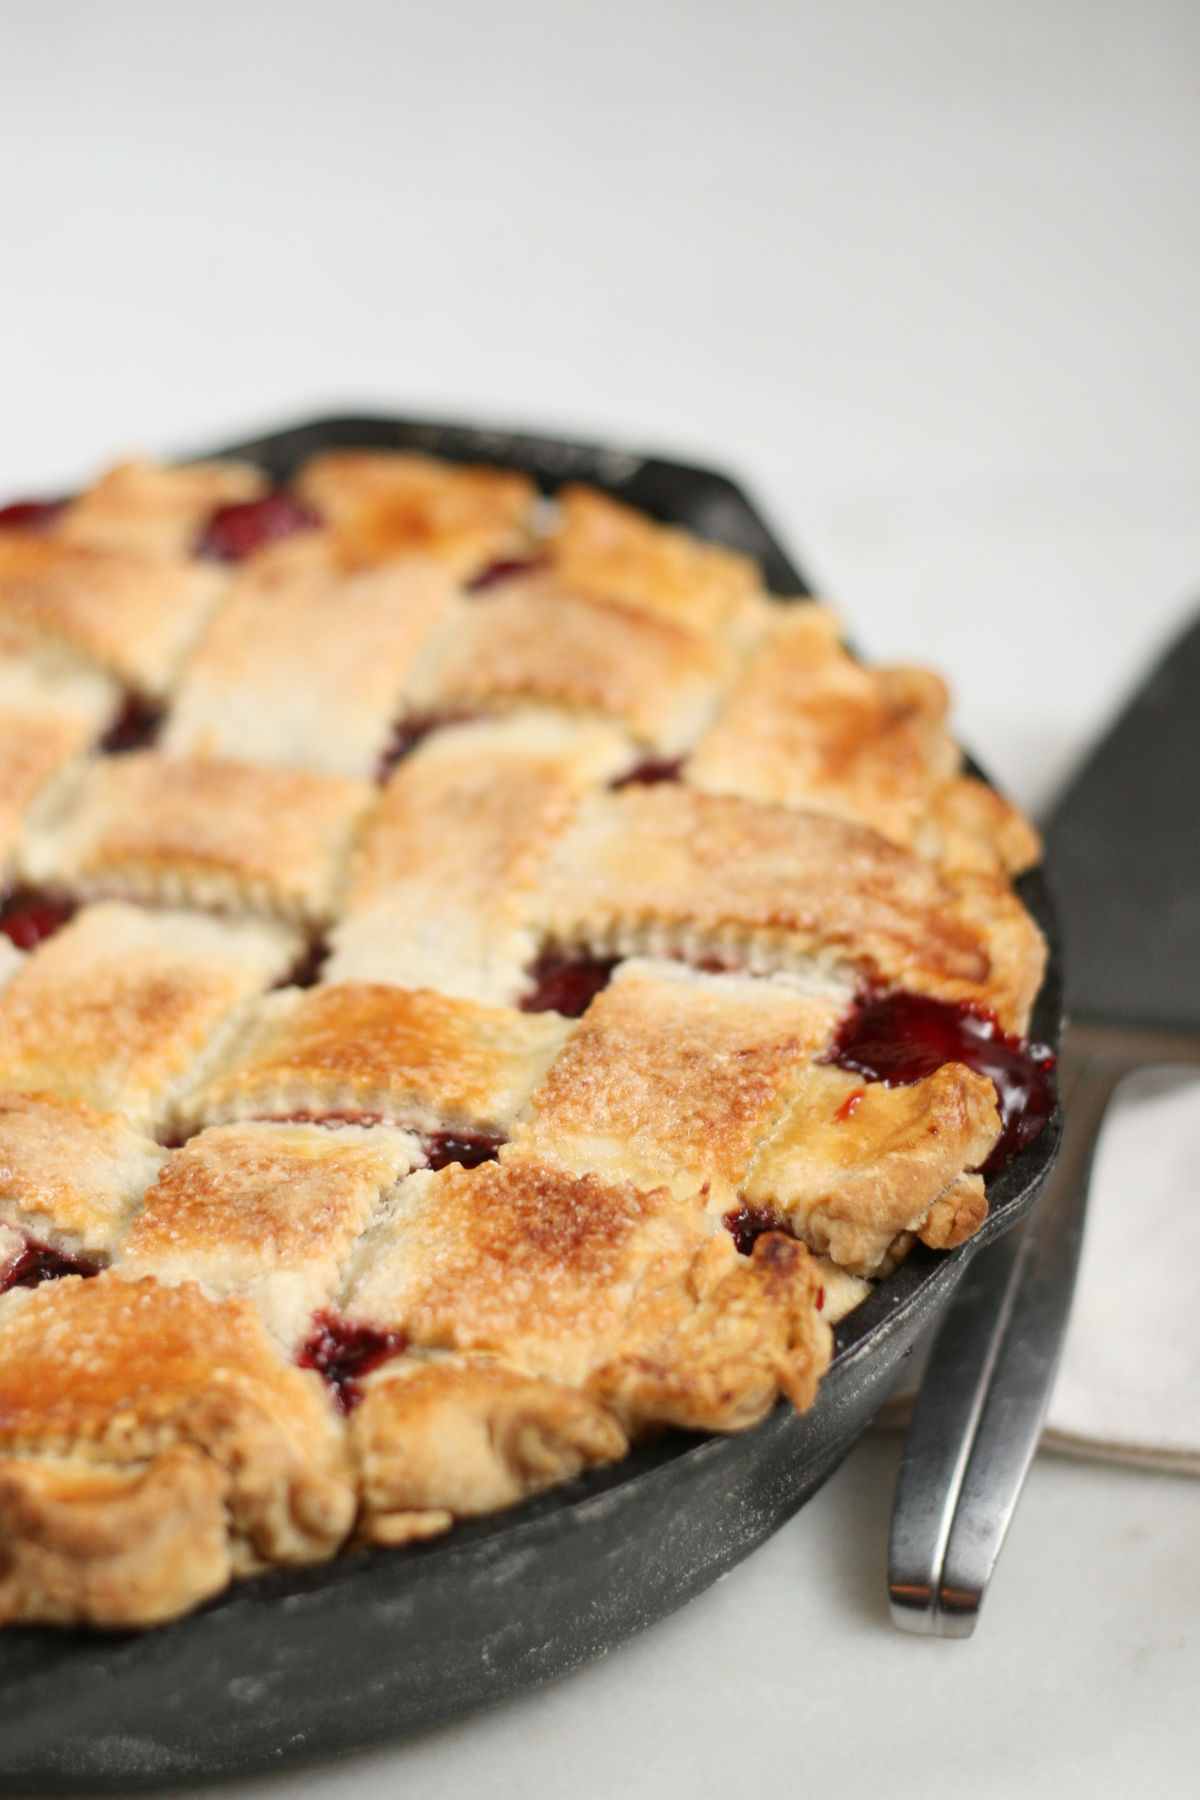
Cooking a pie in a cast-iron skillet will give you the most amazing pie crust, perfectly cooked. If you’re results comes out like mine, you’ll probably never cook a pie in a regular pie dish again!
How to make flaky pie crust
To make your life easier, make your pie crust the night before and plop it in the fridge until the next day. I’m an old-fashioned kinda girl and while I love my food processor, I prefer to make pie dough by hand. I find this method to be better and makes a much flakier crust. The more you handle pie dough, the more tough it will become. Be sure and try my Pie Crust Recipe.
How to make a lattice pie crust
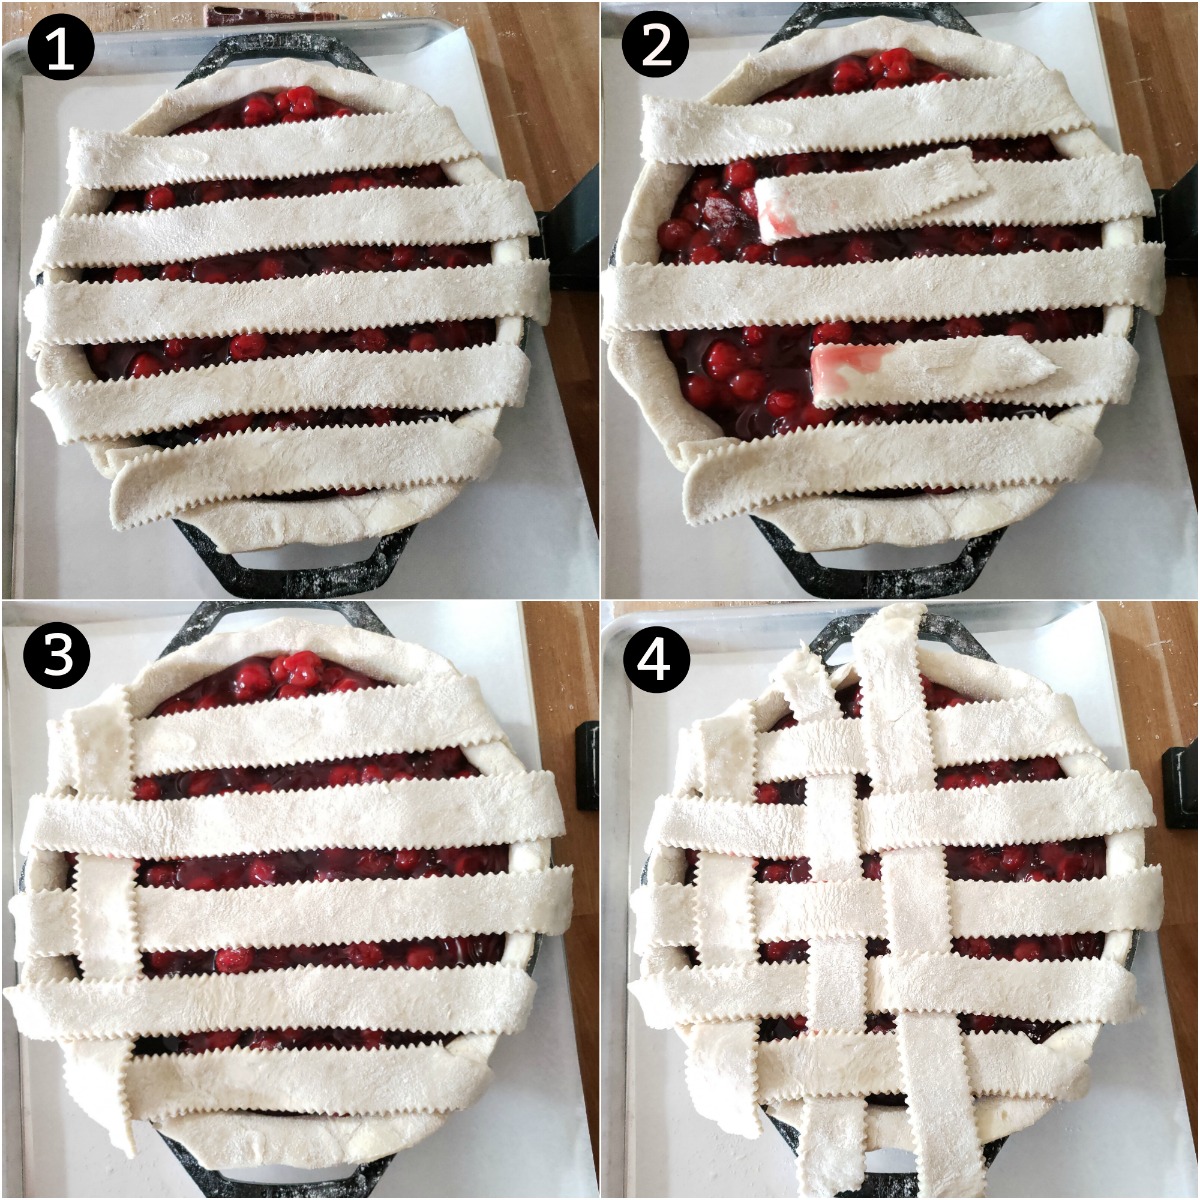
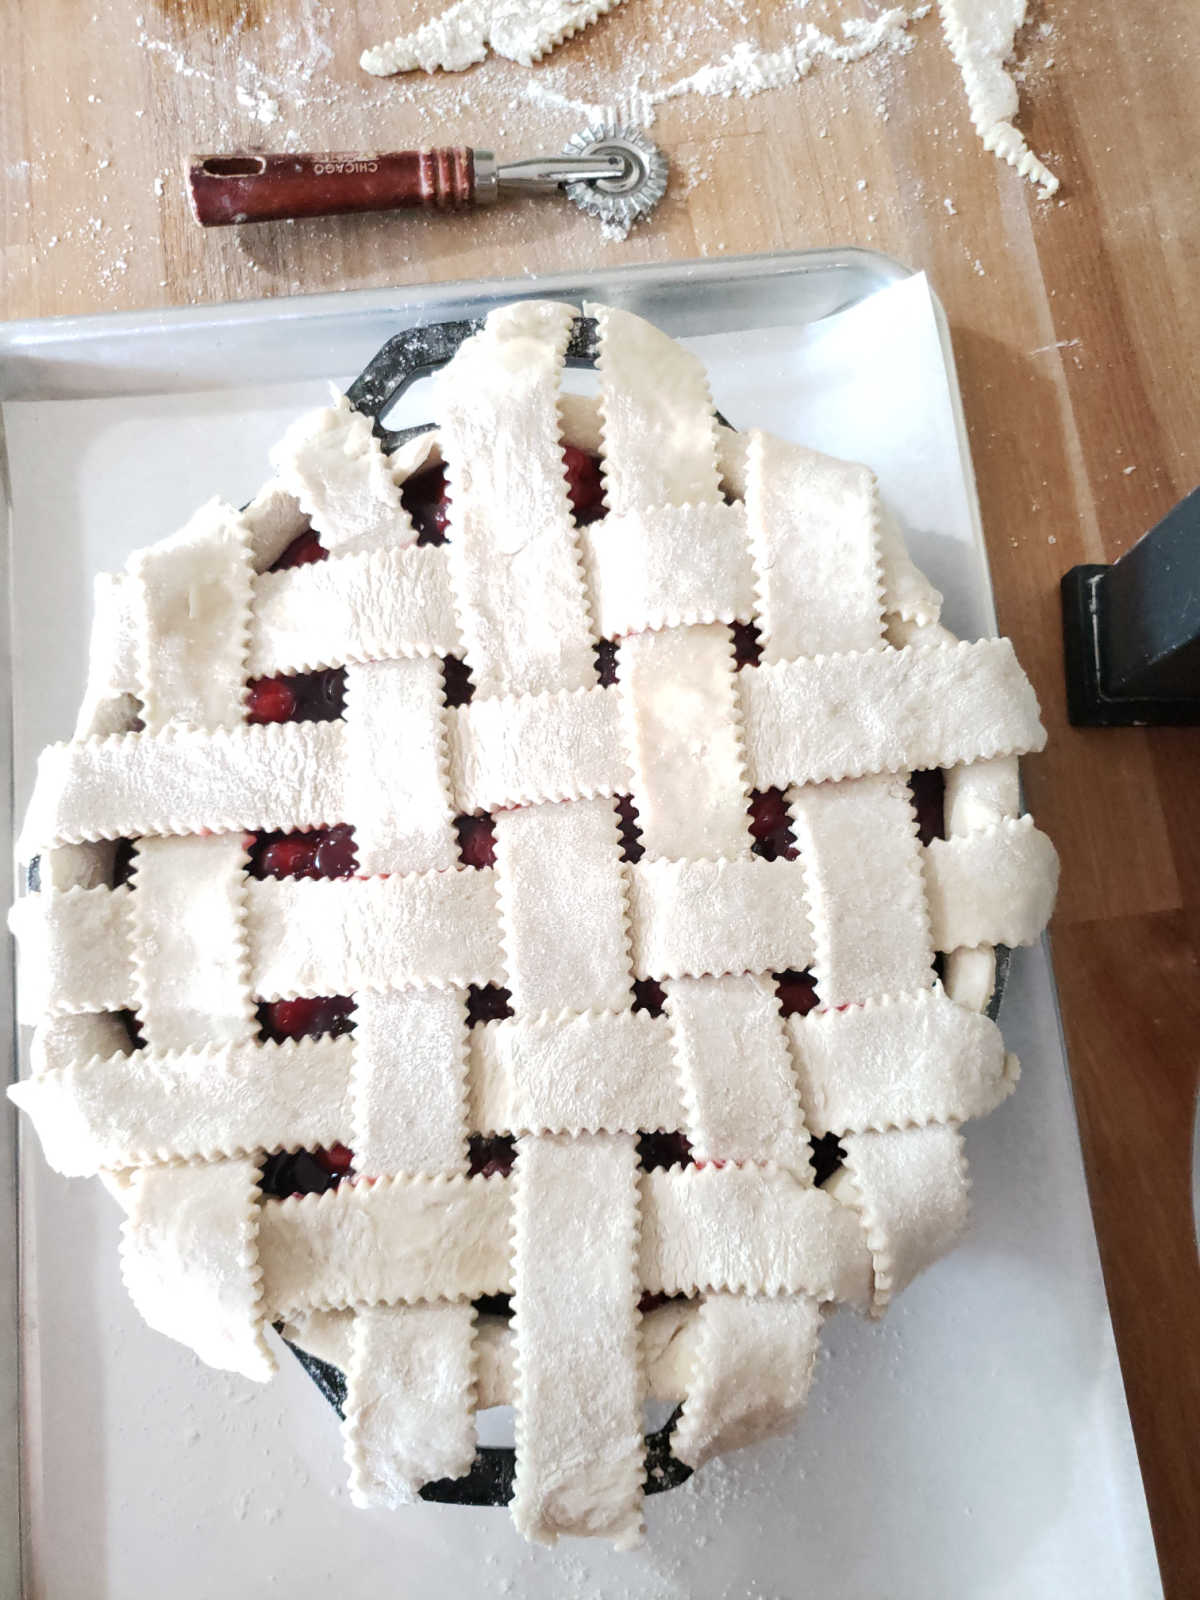
Roll out a piece of pie dough. Then cut into strips either using a small pizza cutter or pastry cutter. Here I used a simple cutter, occasionally I’ll use a pasta cutter that will give you a crimped edge. That’s pretty too when you’re looking to make your pie a little more fancy.
- Step 1: Lay strips of pie dough going the same direction over the entire pie.
- Step 2: Then fold back every other piece of dough and weave in another strip of pie dough going the opposite direction.
- Step 3: Continue this process until you have completed the entire pie.
- Step 4: Fold under the edges and crimp. Then brush with egg wash using a pastry brush, and bake in a preheated 400 F degree oven for about 1 hour or so. Or until the crust is golden brown and the filling is bubbling up.
How to keep pie crust from burning
My mom always covered the pie part way through the baking process with a piece of aluminum foil with a little slit cut out of the center in order to vent the steam. So, I do the same with all of my pies. This helps the pie continue to bake without burning the crust. We were raised to use what we had, no fancy gadgets needed.

Tools for making homemade cherry pie
Pie Crust: Use store-bought or homemade pie crust. Be sure your pie crust is well-chilled while making pie.
- Pastry Blender – Needed to cut in lard, vegetable shortening, and/or butter into the flour and salt mixture when making homemade pie crust.
- Rolling Pin – Use a wooden rolling pin to carefully roll out your pie dough. Wash by hand with hot water and a little dish soap.
- Cherry Pitter – Easily remove the pits from fresh cherries in no time flat!
- Pastry Brush – Brush on egg wash without damaging the pie crust.
- Pie Plate – Standard size is 9 ½-inches, oven safe glass and dishwasher safe.
- Dual Handle Cast Iron Pan – 10-inch bakes a pie perfectly.
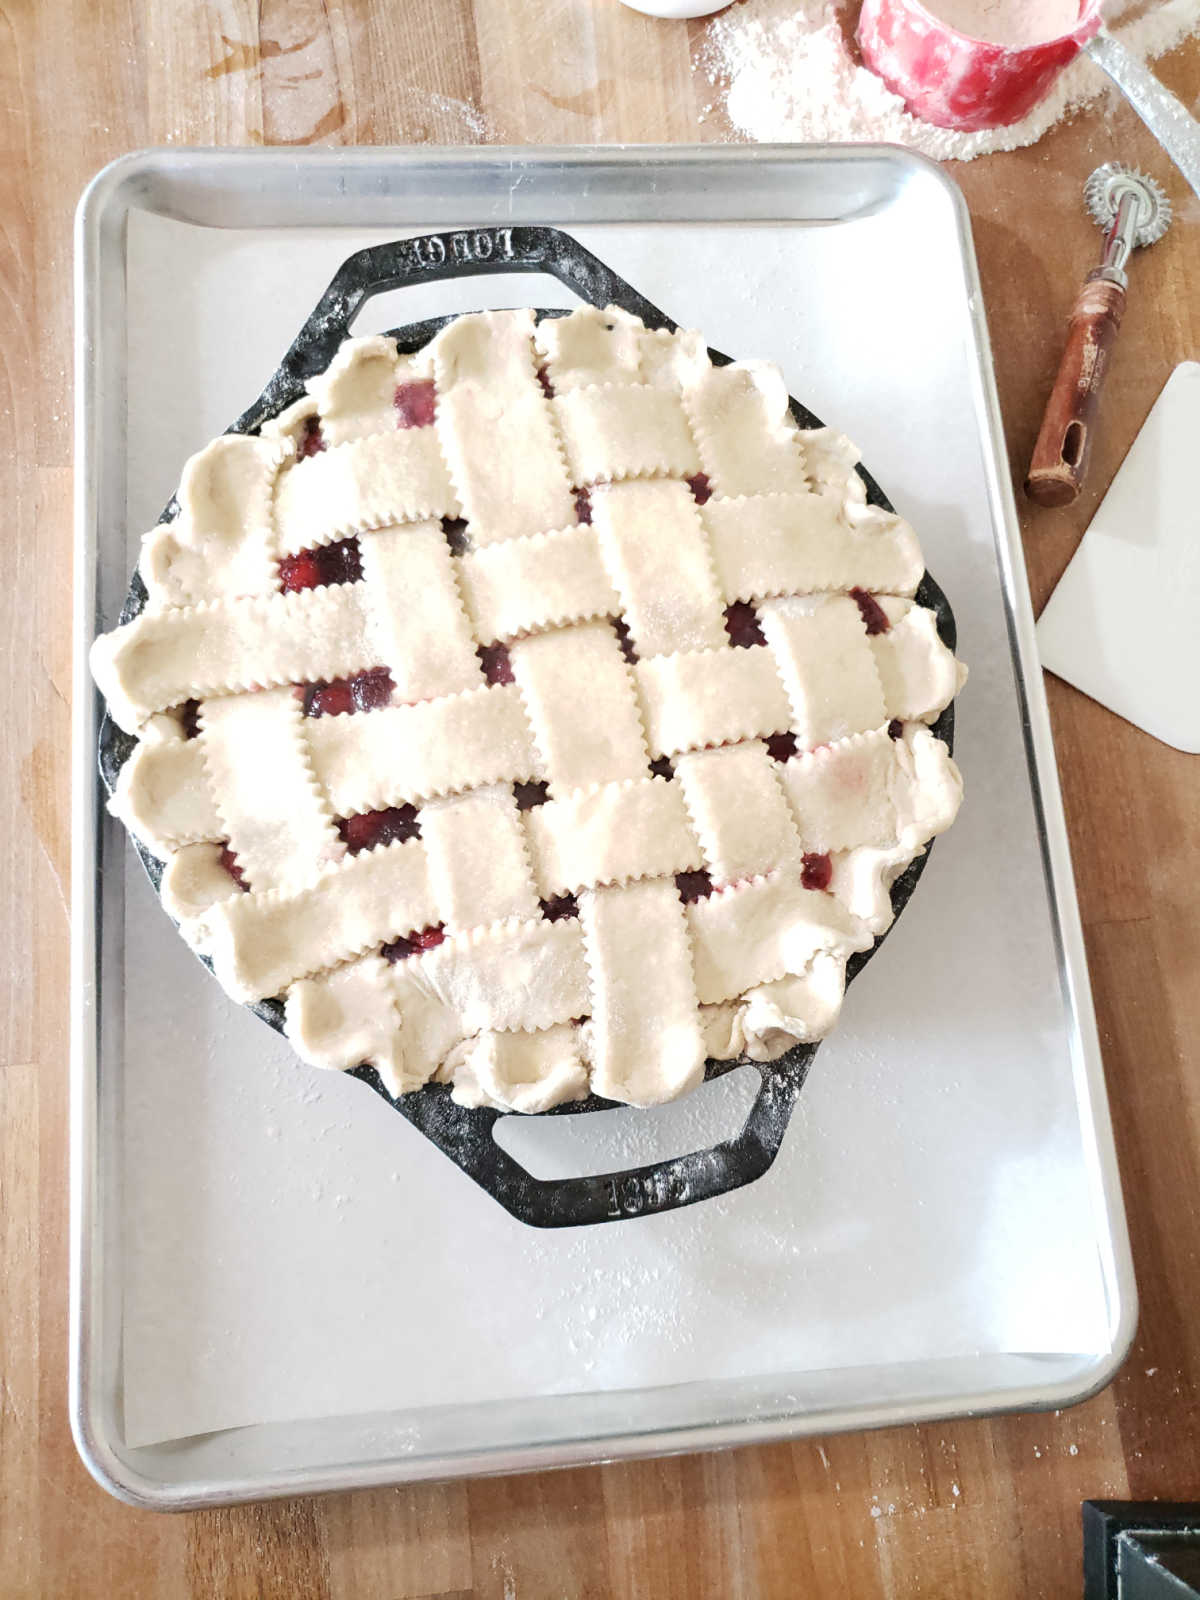
Line a half sheet pan with parchment paper to catch any juices from the cherry pie filling that overflow. This helps clean up much easier!
For one of the very best pies, try making it in a cast-iron skillet. You’ll bake it very similar to the Blueberry Pie I did, but the just until the pie is golden because your pie filling is already cooked. Let the pie cool completely before slicing or you’ll have a gooey mess.
How to thicken pie filling
With this pie recipe and my Apple Hand Pies I use cornstarch. But with many of my fruit pies, I tend to prefer instant tapioca. It’s such a great product if you’ve never tried it, you definitely should!
Recipe FAQs
Absolutely! Make it ahead of time, let cool to room temperature and place in plastic, freezer safe storage containers. Seal the containers and be sure and label the with the date and contents.

More pie recipes
- Blueberry Slab Pie
- Caramel Apple Pie
- Cherry Crumb Pie
- Cherry Cobbler
- Apple Hand Pies
- Blackberry Pie
- Blackberry Hand Pies
- Peach Pie
- Peach Crumb Pie
- Peach Cobbler
Did you make one of my recipes? Please take a moment to leave a star rating. Also, if you are on Pinterest, please feel free to leave a comment there! Follow A Farmgirl’s Kitchen on FACEBOOK, PINTEREST and YouTube and subscribe my mailing list for ALL the latest recipes!
Cherry pie filling
Ingredients
Cherry Pie Filling
- 4 pounds Bing cherries pitted
- ¼ cup (½ stick) butter
- 1 to 1 ½ cups granulated sugar
- ¼ cup lemon juice
- 2 tablespoons cornstarch
- ¼ cup cold water
Pie Crust
- 3 cups all-purpose flour
- ⅔ cup lard
- 5 tablespoons butter, cold, cut up
- 1 teaspoon salt
- ½ cup ice water (adjust as needed)
Instructions
Cherry Pie Filling
- Pit the cherries over a glass liquid measuring cup. Place pitted cherries into a deep frying pan. Place your hand over the pits and pour any excess juices into the pan.
- Add the cherries into a large cast iron skillet or pot and cook over medium heat. Add the butter, sugar and lemon juice. Cook until soft, stirring with a wooden spoon occasionally. Dissolve the cornstarch into cold water, stir with a tablespoon.
- Stir the cornstarch mixture into the cherry mixture. Cook over medium to high heat to thicken. Stir constantly with a wooden spoon.
- Let cherry pie filling cool completely before putting into the pie shell.
Pie Crust
- In a large bowl, combine the flour and salt. Cut in the lard and butter pieces using a pastry cutter, until you have small pea size pieces. Incorporate a little water at a time, until your pie crust comes together. Do not overwork the dough or the pie crust will be tough.
- Place the pie crust into a large zip-style bag and refrigerate for several hours or overnight.
Cherry Pie
- On a lightly floured surface roll out the bottom pie crust. Place into a 9-inch glass pie plate or 9-inch cast iron skillet. Spoon the cooled cherry pie filling into the pie shell.
- (If using a cast iron skillet be sure and spray the pan with cooking spray prior to putting the crust in it)
- On a lightly floured surface, roll out the top pie crust and place on top of the cherry pie filling. Slice air a few vents in the top of the crust.
- Or roll out the top crust and slice long pieces with a small pastry cutter or pizza cutter. Place pieces one way, then weave crust pieces the opposite direction. Continue until the pie is covered with pie crust.
- Brush entire pie gently using a pastry brush with egg wash and sprinkle with granulated sugar.
- Place the pie on a half sheet pan lined with parchment paper. This will help contain the mess. Bake in a preheated 400 degree F oven for about 1 hour.
- Once it is browned nicely, cover with a piece of aluminum foil with an air vent cut out of the top. This will keep the pie from becoming too brown while continuing to cook and still let air vent. Bake until the pie filling is bubbling. About 1 hour 10 minutes total.
- Remove the pie from the oven. Let cool completely before slicing.
Recipe Notes
Nutrition
Disclosure: As an Affiliate Marketer, I earn from qualifying purchases. If you click a product affiliate link on A Farmgirl’s Kitchen and make a purchase, I may receive a commission at no additional cost to you! I own every cooking product I recommend and love how they perform.
Dennis Kennedy says
Turned out beautiful great taste thank you
Jessica Robinson says
Dennis,
So happy to hear you loved it!
Dennis says
Can I use frozen cherries and do I need to throw them
Jessica Robinson says
Hi Dennis,
Yes, you can use frozen cherries! You do not need to thaw them- but cook in a little bit of water (just so they don’t burn!)
Vanessa says
Turned out amazing but I used my crust recipe.
Jessica Robinson says
Glad to hear that you enjoyed the cherry pie recipe!
Dennis says
My cherries did not thicken much should I add more corn starch and water?
Jessica Robinson says
You can add a touch more cornstarch dissolved in cold water. Make sure you cook the filling long enough/over medium heat, until it bubbles nicely.
Mart says
Omg I just made the Cherry Pie so easy . Thanks for sharing the recipe. No more can filling for me!!
Jessica Robinson says
So glad to hear you enjoyed it!! So good, right?!
Jane says
Simple recipe, but the taste is great. Thanks for your sharing the recipe. Love it.
Jessica Robinson says
Jane,
Simple is many times so much better! Thanks for visiting!
Samuel frodo says
This looks awesome and the best part is it seems pretty easy, I’ll be sure to try this out. Thank you for sharing
Le says
This sounds so simple that using a canned pie filling is totally unnecessary!
Nina says
I love pies. this is so easy and simple recipe, I cannot wait to try baking it by myself 🙂 thank you
Annie Cho says
This looks absolutely delicious. I haven’t had cherry pie in years now, so I should make this!
xoxo
Annie
Maysz says
This is look delicious! and I have an idea on how to bake cherry pie thanks for sharing!
Ashley says
This pie sounds Amazing! I will most definitely make this over the summer.
Laurie says
Mmm….cherry pie is one of my favorites! What makes the cast iron skillet a better bake for the pie? I use my cast iron skillet for a lot of items but haven’t baked in it, yet. Thanks!!!
jplagens says
This actually looks pretty easy. Nice to know tapioca is a good thickener. I have pinned this to try.
Jessica Robinson says
It’s super simple to make and you’re gonna love the taste! I keep instant tapioca in my pantry at all times for other fruit pies!
Jacqueline Debono says
I love cherries and we live in a big cherry growing area in Northern Italy. But, I’ve never made a cherry pie filling. Def need to try it!
Jessica Robinson says
Jacqueline,
This was something I had never made from scratch either. Now I make it all the time! Italy must be amazing this time of year!
Lisa Torres says
This filling is so simple, and WAY better than what comes in the can. I will be making it again this summer, thanks Jessica for another winning recipe!