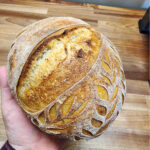
Beginners Sourdough Bread
Beginners sourdough bread recipe uses simple ingredients, has crusty exterior, incredible airy crumb and wonderful tangy flavor. It's a low-hydration dough that's easy to handle..
Servings 1 loaf
Calories 1535kcal
Ingredients
Beginners Sourdough Bread
- 400 grams unbleached bread flour (mix of unbleached bread flour, all-purpose and whole red wheat flour)
- 115 grams active sourdough starter
- 280 grams lukewarm water
- 8 grams sea salt
Instructions
Levain
- The night before, feed the starter. (4-8 hours prior to making the bread) Place in a warm area (78-80 degrees F) to let it expand. It will build bubbles and double in size. Once it’s at peak or nearly at peak fermentation, place it into the fridge overnight.
- Day of making bread; take the ripe starter out of the refrigerator in order to come to room temperature.
Autolyse
- In a large bowl or plastic container, mix the flour and water. Use a dough whisk to mix as best as you can. This is a low hydration dough, so you can use your hands to incorporate the ingredients.
- Mix until the flour is incorporated. The dough will be very dry and shaggy. Cover and let rest in a warm area (78-80 degrees F) for a minimum of 1 hour. Up to 3 hours.
Mix in active starter & salt
- Add the ripe starter over the dough. Sprinkle the salt over top. Mix by hand, using wet fingers to press the starter and salt into the dough. Mix until ingredients are incorporated. Cover with a damp cloth, plastic wrap or cover and let rest for 1 hour.
Bulk fermentation
- Perform a series of stretch and folds. Using slightly wet hands, pinch the dough with your fingers and gently stretch it up, wiggle a little and fold it back down over the dough past the center and release. Turn the bowl or container slightly and repeat this process around the dough. (Do this about 6 times until the dough starts to take shape.)
- Perform 4 sets of stretch and folds at 30-minute intervals. This process will help strengthen the gluten.
- If it's not taking shape, you can also use coil folds.
- Coil folds can also help strengthen your dough. Simply lift the dough from both sides and let it fold under itself. Rotate your bowl or container and repeat the process. Let the dough rest 30 minutes in between each coil fold.
- Use a kitchen timer to remember when to perform S&Fs
- Let the dough rest and increase in size. At the end of bulk fermentation, the dough will have risen 40-70%. It should have some bubbles on the dough. The edge of the dough should be slightly domed, around the edges where it meets the bowl or container. This process should take anywhere from 3-7 hours (depending on how cold or warm it in your house)
- You can use the oven (on the proof bread setting or just with the light on) to bulk proof your dough. I monitored the temperature with a digital thermometer with a probe cord.
Shape and bench rest
- Once the dough is bubbly and risen 40-70%, perform a pre-shape. Dump the dough onto a very lightly floured work surface. (This dough will be very sticky! And you want that!)
- Shape the dough into rounds. Using your left hand push it away from you, slightly rotating it and bring it back towards you with the bench scraper. Bringing the bottom under the dough. This is building tension.
- Let the dough rest for 20-minutes, uncovered.
- Shape into rounds. Flip the rounds over, (if making more than one loaf, work with one round at a time) and stretch into a rectangle shape, on a very lightly floured work surface. Be careful not to use too much flour. Don't add flour on the top of the dough.
- Fold the end over towards you and then each side corner over towards the center. Press those onto themselves. Repeat this process all the way down the dough, almost as though you were braiding the bread. Pressing down each time.
- Starting from the top, roll the dough into itself and tucking it. Keep rolling and tucking until the dough is fully shaped. Tuck the ends with your fingers or use a bench scraper to slightly rotate the dough.
- Place in rice floured bannetons, cover with a plastic bag or inexpensive plastic shower caps which will help prevent the dough from drying out during the cold proofing process.
- *I use a 7 to 8-inch banneton for this recipe!
Cold proof
- Place the bannetons of dough into the refrigerator overnight. Or up to 36 hours.
Scoring and baking
- Pre-heat the oven with the Dutch oven for 1 hour. 550 degrees F.
- Remove the plastic wrap or plastic shower cap from the dough. Discard or turn it inside out to thoroughly dry and reuse later.
- Lightly flour and sprinkle the dough with cornmeal. Place a piece of parchment paper over it and hold secure with your hand. Flip it over to release from the proofing basket onto a work surface.
- Brush away any excess rice flour that may be hardened.
- Score the bread RIGHT before baking, while the dough is still very cold. Use a bread lame to score the dough. Hold the lame at a 45 degree angle and cut the deep score. (Make this cut last!)
- Use the parchment paper to carefully transfer the dough into the preheated Dutch oven.
- Bake at 550 degrees F in a Dutch oven with the lid on for 20 minutes. Carefully remove the lid and continue to bake, uncovered at 450 degrees F for 15 minutes. Place a half sheet pan under the Dutch oven at this point to help prevent the bottom of the bread from burning or becoming too dark. Look for the color and internal temperature should be 200-205 degrees F.
- Carefully remove the bread from the pot and let cool for at least 1-2 hours before slicing
Video
Notes
Tips for successful sourdough bread
For the best flavor, I prefer a mix of unbleached bread flour, all-purpose and whole red wheat flour. You can also add a touch of spelt flour or wheat germ. You can use only bread flour and it work great too! During the winter, I often use the oven on proof setting or the light on to proof the dough. Rice flour is essential for flouring bannetons or proofing baskets. Rice flour acts as a moisture barrier and will not stick the way traditional flour does. Dough will just fall out of the proofing baskets. Use disposable shower caps to cover bowls and bannetons Use a Dutch oven you don't care about getting dark spots. Baking at such a high temperature will cause imperfections in the Dutch oven. Use high-heat kitchen mitts. This is a MUST! The Dutch oven is extremely hot and will burn through most pot holders. It will burn you severely if you are not careful.Nutrition
Calories: 1535kcal | Carbohydrates: 309g | Protein: 51g | Fat: 7g | Saturated Fat: 1g | Polyunsaturated Fat: 3g | Monounsaturated Fat: 1g | Sodium: 3124mg | Potassium: 401mg | Fiber: 10g | Sugar: 1g | Vitamin A: 8IU | Calcium: 70mg | Iron: 4mg