Salt Dough Ornaments
Make these adorable Salt Dough Ornaments at home and give handmade gifts for the holidays. Easy to make and kid-friendly.
Servings 24 ornaments
Ingredients
Salt Dough
- 2 cups all-purpose flour
- 1 cup salt
- 1 cup water
Instructions
Salt Dough
- Mix the above ingredients in a bowl and roll out on a lightly floured surface to your desired thickness.
- You'll want to lightly flour the surface of the dough once rolled out, so your cookie cutters don't stick. Cut out your desired shapes (I found really cool vintage cookie cutters on Ebay) and carefully lift them up with the spatula. Place the cookie shape into your left hand and smooth out the edges with your right (opposite if you are left handed). Slide gently onto a parchment lined cookie sheet.
- Put a hole in the top of the cookie with a disposable straw. Twist the straw around in a circular motion to make the hole a little bigger. (it will close up a bit during the baking process)
- Bake at 170-200 degrees for about 12-15 hours. You'll need to bake them at this low temperature for a long period of time so they don't puff up or curl. Once they are done, let them cool fully.
Prep Salt Dough Ornaments for paint
- Brush off any excess flour and paint the entire cookie with white acrylic paint as a base coat. Set aside and let them dry thoroughly. Apply a coat of white acrylic paint as a base coat to all of the cookies. Set on Kraft paper to dry thoroughly.
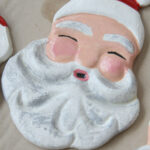
- I like to work in an assembly line of sorts. I start with red, for example and by the time I'm done painting that color they are dry and I can move on to the next color. Once they are all done you can go back and touch up any spots of paint you are not happy with. (For my Santa ornaments, I paint the beard white and then dry brush on gray for added texture. Same for his cheeks with a little bit of blush for added color.) Let them dry well.
- You'll want to apply a thin layer of oil-based polyurethane to each side, one side at a time. Apply about 3-4 coats per side and let dry thoroughly in between coats. Set them on Kraft paper as they dry. They should last for many years to come.